A while ago, I had a very brief chat with Mac Gerdts (the author of Concordia) about whether or not someone had approached him to do Concordia for iOS. It was an interesting discussion and he thought that getting the AI right would be trickiest part. My 2 cents where that – in most cases – doing board games on iOS is unfortunately not a (financially) viable enterprise.
… Read MoreEnglish
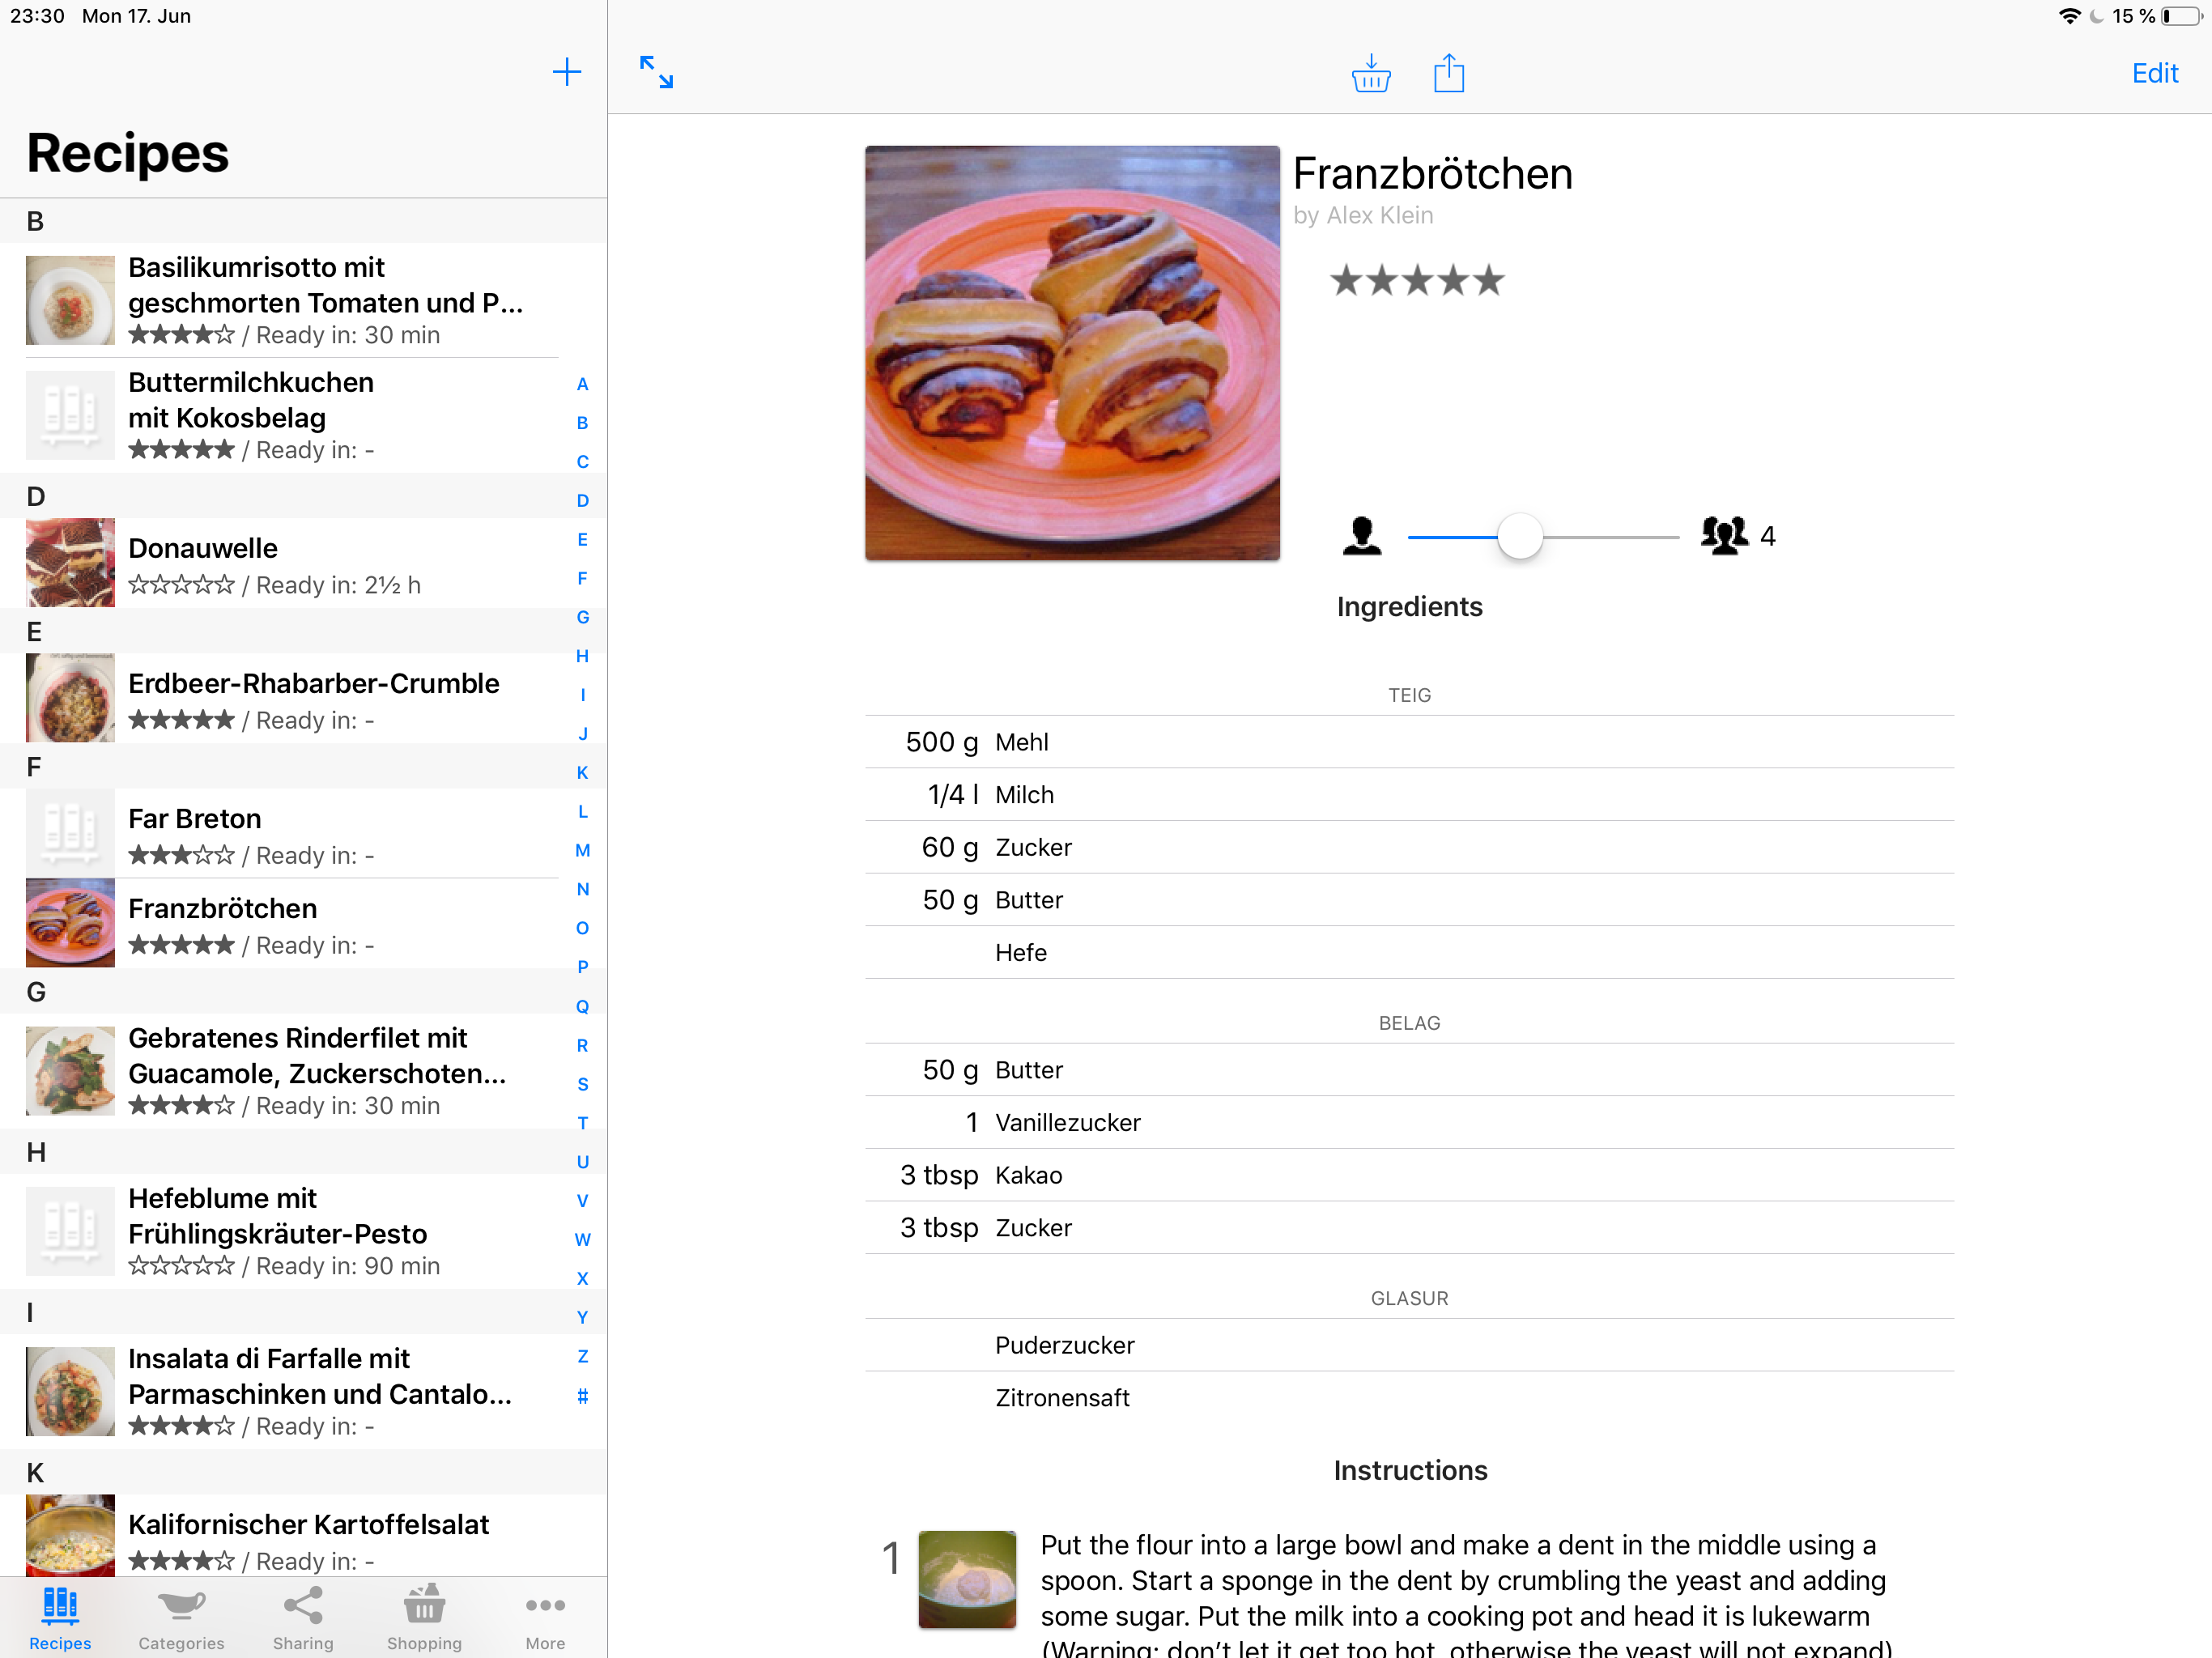
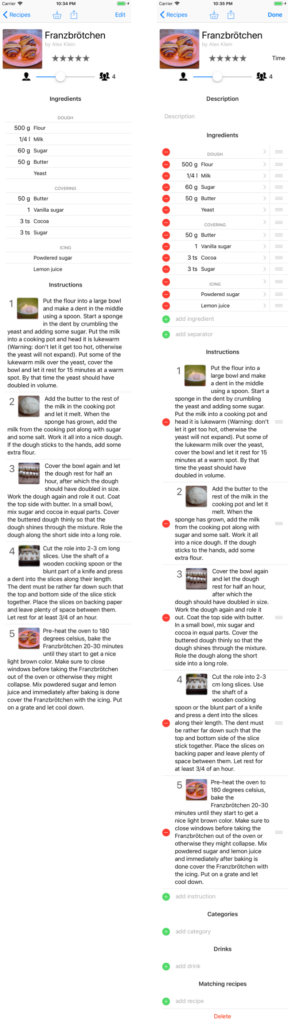
My Favorite Recipes Is Back in the AppStore
It’s back! After a massive overhaul a while ago, I finally managed to tie up all the loose ends and re-submit the app back to the AppStore. The app first hit the AppStore almost 10 years ago!
That meant porting it from what basically was iOS 3.1 code to iOS 12, switching to Storyboard-based interface, creating an iPad version, supporting Dynamic Type (resizable fonts) and many, many more thing that iOS users today simply expect. It’s still not the most flashy recipe app, but darn it if it isn’t the one with the best user interaction : )
Unfortunately, I haven’t managed to implement iCloud Syncing yet which would be very handy for keeping my iPhone and iPad in sync. But implementing this correctly will take some serious time and so I opted for rather getting the app out into the wild again and adding stuff like that later.
I also dropped the price to the lowest tier, will be interesting to see what effect that will have.
Planar Quads in Blender – Making Faces Flat
I’ve seen a lovely flat shaded rendering style yesterday and while trying to emulate it, I noticed it’s important to have quads actually being flat for flat shaded rendering. As the rendering system splits everything into triangles, having a non-flat quad results in a edge that is visible as both triangles of the quad will have a slightly different shading. To my surprise, no good information on how to make a polygon flat could be found on the net…
The easiest way that I came up with to make a non-axis aligned polygon flat is this:
![]()
- Change the Transformation Orientation Mode from Global to Normal(combo box next to the transformation gizmo settings)
- Change the vertex snapping mode from Increment to Vertex and deactivate it (the little magnet is grayed out, combo box next to it shows two dots on a cube)
- Select three vertices that form the final plane you want the quad to lie in.
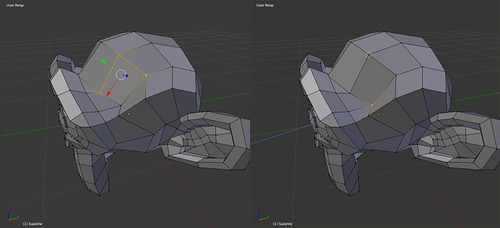
- Press Ctrl+Alt+Space to create a new custom orientation (transformation coordinate system), give it some name and make sure the Overwrite Previous is turned on. The coordinate system’s z-axis will be orthogonal to our defined plane (left part of the screenshot).
- Now select the off-plane vertex, press g to translate, and twice z to limit the transformation to the newly created coordinate system’s z axis (notice the blue line in the right part of the screenshot).
- Press and hold ctrl and move the mouse cursor over one of the three reference vertices so that the transformation snaps its z-value to that vertex (notice the orange snap circle in the right part of the screenshot).
- Release the mouse button and voila, the quad is now perfectly flat.
Since we enabled “Overwrite Previous”, for the next quad one just has to select three vertices, press ctrl+alt+space (overwriting the previously generated coordinate system), g, z, z, hold ctrl and move over a reference vertex (to snap), release, done. Sounds complicated at first but it’s actually very fast to do. Hope that helps
Alex
Detecing and fixing encoding problems with NSString
When you’re working with strings on iOS, it’s only a question of time before you start using stringWithContentsOfURL, either for downloading something from the web or handling a file import to your App. One of the major pains of working with strings is the encoding issue: a string is an array of bytes and to make sense of it, you got to know how what the bytes mean.
In the early days, one just used one byte for a character and came up with the famous ASCII encoding. But of course 256 characters is by far not enough to handle all the characters in the world (think of all the Asian languages) so different people invented different encodings until at one point, the Unicode people came around in an effort to propose an encoding that contains all characters for all languages. Unfortunately, there is both UTF8 and UTF16, so there is not even a single Unicode encoding, but hey, that’s besides the point here. Unicode made a lot of stuff simpler and the world a better place.
Classes like NSString do a good job of hiding away that problem. The problem hits you when you’re receiving bytes from an external source (a.k.a. a webpage) and have to figure out what encoding the stuff is. Let’s take the German character “Ä” for example: in Latin1 encoding, that’s just one byte with a value of 196. In Unicode UTF8, its two bytes: 0xc3 0x84. So you download that list of bytes and have to figure out what’s what. If you have a UTF8 encoded page and incorrectly assume it’s Latin1, you end up with “Ä”. Luckily, most modern formats like HTML or XML suggest that the encoding should explicitly be stated somewhere in the file.
What’s that got to do with iOS you may ask yourself. Well, I ran into a couple of problems when trying to use Apple’s methods to automatically detect the correct encoding when it comes to Latin1 encoded data. So here is some source code to help others with the same problem:
StringUtils.h
#import <Foundation/Foundation.h>

@interface NSString (NSStringAdditions)
// Checks for UTF8 German umlauts being incorrectly interpreted as Latin1.
- (BOOL)containsUTF8Errors;
// Replaces the umlaut errors with the correct characters.
- (NSString*)stringByCleaningUTF8Errors;
// Uses various attempts to guess the right encoding or fix common
// problems like NSStrings problem to detect Latin1 correctly.
+ (NSString*)stringWithContentsOfURLDetectEncoding:(NSURL*)url error:(NSError**)error;
@end
StringUtils.m
#import "StringUtils.h"

@implementation NSString (NSStringAdditions)

- (BOOL)containsUTF8Errors
{
    // Check for byte order marks
    // http://en.wikipedia.org/wiki/Byte_order_mark
    if ( [self rangeOfString:@"Ôªø"].location != NSNotFound )
    {
        return true;
    }
    // Now check for weird character patterns like
    // Ä ä Ö ö Ü ü ß
    // We basically check the Basic Latin Unicode page, so
    // U+0000 to U+00FF.
    for ( int index = 0; index < [self length]; ++index )
    {
        unichar const charInput = [self characterAtIndex:index];
        if ( ( charInput == 0xC2 ) && ( index + 1 < [self length] ) )
        {
            // Check for degree character and similar that are UTF8 but have incorrectly
            // been translated as Latin1 (ISO 8859-1) or ASCII.
            unichar const char2Input = [self characterAtIndex:index+1];
            if ( ( char2Input >= 0xa0 ) && ( char2Input <= 0xbf ) )
            {
                return true;
            }
        }
        if ( ( charInput == 0xC3 ) && ( index + 1 < [self length] ) )
        {
            // Check for german umlauts and french accents that are UTF8 but have incorrectly
            // been translated as Latin1 (ISO 8859-1) or ASCII.
            unichar const char2Input = [self characterAtIndex:index+1];
            if ( ( char2Input >= 0x80 ) && ( char2Input <= 0xbf ) )
            {
                return true;
            }
        }
    }
    return false;
}

- (NSString*)stringByCleaningUTF8Errors
{
    // For efficience reasons, we don't use replaceOccurrencesOfString but scan
    // over the string ourselves. Each time we find a problematic character pattern,
    // we copy over all characters we have scanned over and then add the replacement.

    NSMutableString * result = [NSMutableString stringWithCapacity:[self length]];
    NSRange scanRange = NSMakeRange(0, 0);
    NSString * replacementString = nil;
    NSUInteger replacementLength;
    for ( int index = 0; index < [self length]; ++index )
    {
        unichar const charInput = [self characterAtIndex:index];
        if ( ( charInput == 0xC2 ) && ( index + 1 < [self length] ) )
        {
            unichar const char2Input = [self characterAtIndex:index+1];
            if ( ( char2Input >= 0xa0 ) && ( char2Input <= 0xbf ) )
            {
                unichar charFixed = char2Input;
                replacementString = [NSString stringWithFormat:@"%C", charFixed];
                replacementLength = 2;
            }
        }
        if ( ( charInput == 0xC3 ) && ( index + 1 < [self length] ) )
        {
            // Check for german umlauts and french accents that are UTF8 but have incorrectly
            // been translated as Latin1 (ISO 8859-1) or ASCII.
            unichar const char2Input = [self characterAtIndex:index+1];
            if ( ( char2Input >= 0x80 ) && ( char2Input <= 0xbf ) )
            {
                unichar charFixed = 0x40 + char2Input;
                replacementString = [NSString stringWithFormat:@"%C", charFixed];
                replacementLength = 2;
            }
        }
        else if ( ( charInput == 0xef ) && ( index + 2 %lt; [self length] ) )
        {
            // Check for Unicode byte order mark, see:
            // http://en.wikipedia.org/wiki/Byte_order_mark
            unichar const char2Input = [self characterAtIndex:index+1];
            unichar const char3Input = [self characterAtIndex:index+2];
            if ( ( char2Input == 0xbb ) && ( char3Input == 0xbf ) )
            {
                replacementString = @"";
                replacementLength = 3;
            }
        }

        if ( replacementString == nil )
        {
            // No pattern detected, just keep scanning the next character.
            continue;
        }

        // First, copy over all chars we scanned over but have not copied yet. Then
        // append the replacement string and update the scan range.
        scanRange.length = index - scanRange.location;
        [result appendString:[self substringWithRange:scanRange]];
        [result appendString:replacementString];
        scanRange.location = index + replacementLength;

        replacementString = nil;
    }

    // Copy the rest
    scanRange.length = [self length] - scanRange.location;
    [result appendString:[self substringWithRange:scanRange]];

    return result;
}

+ (NSString*)stringWithContentsOfURLDetectEncoding:(NSURL*)url error:(NSError**)error
{
    NSError * errorBuffer = nil;
    NSStringEncoding encoding;
    NSString * result = [NSString stringWithContentsOfURL:url usedEncoding:&encoding error:&errorBuffer];
    if ( errorBuffer != nil )
    {
        errorBuffer = nil;
        result = [NSString stringWithContentsOfURL:url encoding:NSUTF8StringEncoding error:&errorBuffer];
    }
    if ( errorBuffer != nil )
    {
        errorBuffer = nil;
        result = [NSString stringWithContentsOfURL:url encoding:NSISOLatin1StringEncoding error:&errorBuffer];
        if ( ( errorBuffer == nil ) && ( [result containsUTF8Errors] ) )
        {
            result = [result stringByCleaningUTF8Errors];
        }
    }
    if ( errorBuffer != nil )
    {
        errorBuffer = nil;
        result = [NSString stringWithContentsOfURL:url encoding:NSASCIIStringEncoding error:&errorBuffer];
    }

    *error = errorBuffer;
    return result;
}

@end
Alpha is not Transparency – Premultiplied Alpha, Alpha Maps and Trees on iOS
I’ve lately been working on creating 3D models for Streetsoccer that act as background props. One of the most interesting areas is low poly trees and if you look through the Internet, there is hardly any good information out there. Most low poly assets or tutorials one finds do not work well in real time engines due to two things that are always difficult in real time 3D: Transparency and self-shadowing. Since a lot of people I talked to didn’t have the experience of falling into all the pit falls related to that topics yet, I thought I just quickly write down some of them and what one can do about them.
A common technique to create low poly trees is to use a texture of a cluster of leaves, put it on a plane, sub-divided it and bend it a little. Use 5-10 of those intersecting each other and it looks quite alright. The problem is that in reality the upper parts of a tree are casting shadows to the lower parts. So if you use just one texture of leaves, you either end up with a tree that has the same brightness everywhere. If you want to do it right, you end up using multiple textures depending on which part of the cluster has shadow on it and which doesn’t. If you go to stock asset suites, those trees usually look great because they have been raytraced and have some form of ambient occlusion on them.
The other area is transparency. As you may or may not know, real time 3D rendering is rather stupid: Take a triangle, run it through some matrices, calculate some simplified form of lighting equation and draw the pixels on the screen. Take next triangle, run the math again, put pixels on the screen, and so on. So things order of occlusion is in general dependent on the order of triangles in a mesh and the order of meshes in a scene. To fix this, someone invented the Z-Buffer or Depth Buffer which for each pixel stores the depth of the pixel that has been drawn to the screen. Before drawing a pixel, we check whether the pixel the new triangle wants to draw is before or behind the depth value stored in the depth buffer for the last stuff we put at that pixel. If the triangle is behind it, we don’t draw the pixel. This saves us the trouble of sorting all triangles by depth from the viewer position before drawing. By the way, all of this is explanation is rather over-simplified and boiled down to what you need to know for the purposes of this discussion.
Considering that real time 3D graphics work on a per-triangle basis, transparency obviously becomes difficult. Following the description above, there is no real “in front or behind” but rather “what’s on the screen already and what’s getting drawn over it”. So what real time APIs like OpenGL or DirectX do is use Blending. When a non-100% opaque pixel is drawn, it is blended with what is already on the screen proportionally with the transparency of the new triangle. That solves the color (sort of) but what about depth? Do we update the value in the depth buffer to the depth of the transparent sheet of glass or keep it at its old value? What happens if the next triangle is also transparent but lies in between the previous? The general rule is that one has to sort all transparent objects by depth from the viewer and after rendering all opaque objects, render the transparent one in correct order.
If you’ve read a bit about 3D graphics, that should all sound familiar to you. So here comes the interesting parts: The things you don’t expect until you run into them!
Filtering and Pre-Multiplied Alpha Textures
Whenever a texture is applied and the size of the texture does not match the size of the pixels it is drawn to, filtering occurs. The easiest form of filtering is called nearest neighbor where the graphics card just picks the single pixel that is closest to whatever U/V-value has been computed for a pixel on the triangle. Since that produces very ugly results, the standard is to use linear filtering, which takes the neighboring pixels into account and rather returns a weighted average. You probably have noticed this as the somewhat blurry appearance of textures in 3D games.
For reasons of both performance and quality, a technique called Mipmaps is often used which just means lower resolution versions of the original texture are pre-computed by the graphics card. If an object is far away, the lower resolution version is used which better matches the amount of pixels that object is drawn on and thus improves quality.
What few people have actually dealt with is that filtering and transparency do not work well together in real time 3D graphics. When using a PNG texture on iOS, XCode optimizes the PNG before bundling it into your app. Basically it changes the texture so that the hardware can work more efficiently. As one of the things, XCode pre-multiplies the alpha component on to the RGB components. What this means is that instead of storing r, g, b, alpha for each pixel, one stores r times alpha, g times alpha, b times alpha and alpha. The reasoning is that if an image has an alpha channel, the image usually has to be blended when it is rendered anyway and instead of multiplying alpha and RGB every time a pixel in an image is used, it is done once when the image is created. This usually works great and saves three multiplications.
The trouble starts when filtering comes in. Imagine a red pixel that has an alpha value of zero. Multiply the two and you get a black pixel with zero alpha. Why should that be a problem, it’s fully transparent anyway, right? As stated above, filtering takes neighboring pixels into account and interpolates between them. What happens can be seen in Photoshop when creating gradients.
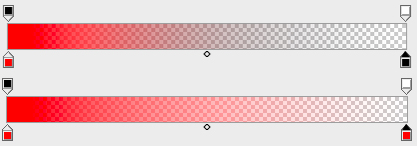
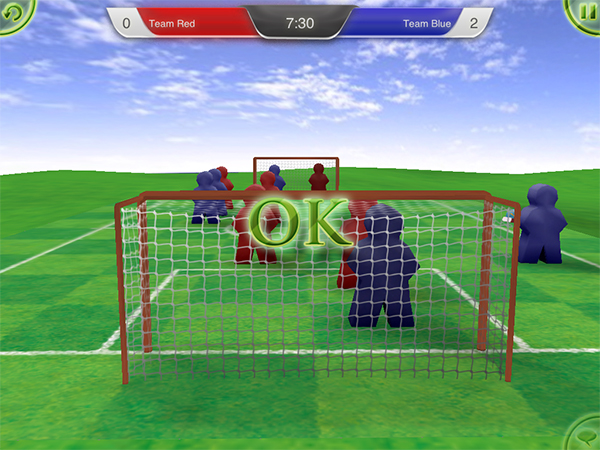
The closer the U/V-values are to the border of the opaque region of the texture and the larger the region of texture that is filtered to a single pixel, the more grayish the result becomes. I’ve first learned this the hard way when it came to the goal nets in Streetsoccer. As probably everyone would, I had just created one PNG with alpha in Photoshop and this is what it looked like:
Although the texture is pretty much pure white, the premultiplied alpha at that distance makes the goal net look dark gray. So how do you get to the version below? Avoid premultiplied alpha!
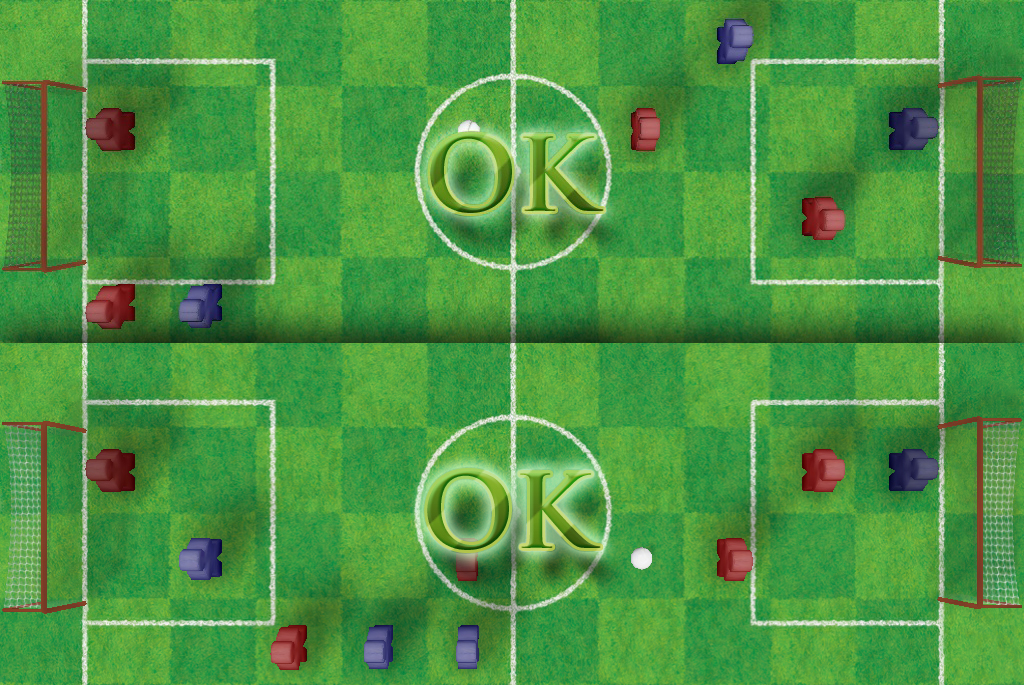
What I’ve done in the shot below is use a separate alpha texture that is black and white in addition to the diffuse texture. During render time, the RGB values are used from the diffuse map and the alpha value is interpolated from the alpha map. I filled the previously transparent parts of the diffuse map with pixels that matched the opaque parts and the result speaks for itself.
Since the Streetsoccer code uses OpenGLES 1.1 right now, I couldn’t simply use a pixel shader but had to use register combiner. Since that’s kind of legacy code and information is hard to find, here is the code:
// Switch to second texture unit
glActiveTexture( GL_TEXTURE1 );
glEnable( GL_TEXTURE_2D );

// Active texture combiners and set to replace/previous for RGB. This
// just takes the RGB from the previous texture unit (our diffuse texture). glTexEnvf(GL_TEXTURE_ENV, GL_TEXTURE_ENV_MODE, GL_COMBINE);
glTexEnvf(GL_TEXTURE_ENV, GL_COMBINE_RGB, GL_REPLACE);
glTexEnvf(GL_TEXTURE_ENV, GL_SRC0_RGB, GL_PREVIOUS); // diffuse map
glTexEnvf(GL_TEXTURE_ENV, GL_OPERAND0_RGB, GL_SRC_COLOR);

// For alpha, replace/texture so we take the alpha from our alpha texture. glTexEnvf(GL_TEXTURE_ENV, GL_COMBINE_ALPHA, GL_REPLACE);
glTexEnvf(GL_TEXTURE_ENV, GL_SRC0_ALPHA, GL_TEXTURE); // alpha map
glTexEnvi(GL_TEXTURE_ENV, GL_OPERAND0_ALPHA, GL_SRC_ALPHA);

[self bindTexture:mesh.material.alphaTexture];

glActiveTexture( GL_TEXTURE0 );

[self bindTexture:mesh.material.diffusTexture];
One important thing though is that the alpha map has to be uploaded as an GL_ALPHA texture instead of the usual GL_RGB or GL_RGBA, otherwise this won’t work. Speaking of which, I might probably just have combined the two UIImages during upload and uploaded them as one GL_RGBA texture… got to check that one out… : )
Intra-object Occlusion
A lot of people are aware of the object-2-object occlusion problem when using transparency and that one has to use depth-order-sorting to solve it. However, what I noticed just lately is that – of course – the same problem can also arise within a single object.
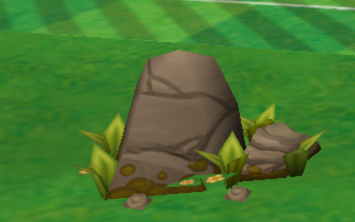
The screenshot above was generated during early testing of the alpha map code. I used an asset from the excellent Eat Sheep game which they kindly provide on their website. Again, it is quite obvious, but again, I was surprised when I save this. What happens here is that the triangles with the flowers are rendered before the stone but all are within the same mesh. Doing depth sorting for each triangle is a bit overkill and sorting per-object clearly does not work here. In the original game, this is not a problem because the asset is usually seen from above.
Not sure what to do about this one just yet. One could edit the mesh to have the flower triangles behind the others inside the mesh’s triangle list but that would be have to re-done every time the mesh is modified. The other idea is to split it into two objects, which of course produces an overhead of a couple of context switches for OpenGL. But for trees with a large viewing angle, that will exploded the number of meshes…
Update Dec 17, 2012
Well, I did a bit more of digging yesterday and the situation gets even weirder. According to some sources on the net:
- Photoshop produces PNGs with pre-multiplied alpha
- The PVR compression tool shipped with iOS does straight alpha (but the PVR compression tool from the PowerVR website can also do pre-multiplied)
- XCode always does pre-multiplied for PNGS as part of its optimizations
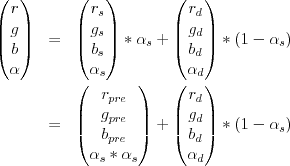
And to make things even more interesting, pre-multiple alpha seems not only to be the source of my original problem but also the answer. The most cited article on this topic seems to be TomF’s Tech Blog. Turns out, if your mipmap texture is in pre-multiplied alpha, filtering does not cause any fringes, halos or whatever, one just has to switch to a different blending function (that is ONE and ONE_MINUS_SRC_ALPHA … which matches my equation from above)…. well, in fact it doesn’t. For as long as I’ve been doing OpenGL, I’ve always read “use alpha and 1-alpha” but that’s wrong! If you check the equation above and assume you are blending a half-transparent pixel on to an opaque pixel, you get 0.5×0.5+1.0×0.5=0.75. That’s clearly not what we want. I’m seriously wondering why this hasn’t caused more problems for me!
The right way to do it is use glBlendFuncSeparate to have a different weighting for the alpha channel, which gives us a new equation and finally one that matches what pre-multiplied alpha does (note that most sources use ONE and not ONE_MINUS_SRC_ALPHA as destination alpha weight in the non-pre-multiplied alpha case which doesn’t seem right if you ask me):
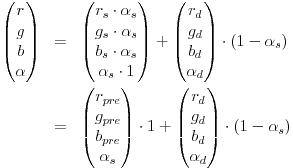
There seems to be concerns on whether or not premultipled alpha causes problems when using texture compression. However, fact is that using a separate texture map adds a number of OpenGL calls for the texture combiners (less important of an argument for OpenGLES 2.0 shaders) and another texture bind. So I guess I’ll try to change my content pipeline to use all pre-multiplied alpha textures!
– Alex
iOS 6 or the Price of Progress
Just downloaded XCode 4.5 and migrated Streetsoccer to support iOS6 and the new, longer iPhone 5 screen. This was necessary as Apple only allows app submissions built with the latest development environment which as a developer I can totally understand. Supporting old versions is always a source of major headaches. What I cannot really understand is why they dropped support for pre-4.3 devices in XCode 4.5! iOS 5.1 SDK was still able to do it, so why drop it now?
I was totally unaware of this and – of course – only noticed it AFTER updating my system. This rendered two of my test devices (a 1st and 2nd gen iPod Touch) completely obsolete, one of which I had sent someone just recently to do some testing of the Streetsoccer beta builds and who I was planning to send an updated version soon.
So after 5 years, my very first iPod Touch has lost its last reason to stick around. I basically got it the first day it was available in Germany and started programming for it the first day the SDK went public. I distinctly remember a good friend of mine asking why I “did buy this piece of electronic garbage” that has no real use compared to his stylus-based mobile phone. Aaaah, those were the days. Now you almost cannot buy an iPhone because everyone else has one!
Hopefully, my 1st-gen iPad will stick around just a bit longer. They dropped iOS 6 support for it already, so it’s only a question of time until I won’t be able to develop for it I guess…
Xcode Bash Script for On-Demand PVR Texture Encoding
Do you know those tiny little things that always annoy you – for a reeaaaallly long time – but you never get around to fix them? For me, one of those things was the custom build phase step to convert my texture to compressed PVR format. Streetsoccer uses some big textures for the ground as well as the skymap and for some reason, xcode seemed to often rebuild those PVRs. So I just sat down and finally modified my build script to check if the PVR version already exists.
To be honest, before rewriting the script, Xcode sometimes did rebuild the PVRs and sometimes it did not. So perhaps this is a moot point and texturetool does this internally, but I don’t thing so. Anyway, here goes:
function convert
{
    # Only convert if PVR does not exist or source texture has a more recent date
    if [ ! -f "$2" ] || [ "$1" -nt "$2" ]; then
    echo converting "$1" to "$2"
    xcrun -sdk iphoneos texturetool -m -e PVRTC --bits-per-pixel-4 -o "$2" -f PVR "$1"
    else
    echo skipping "$2", already up-to-date
    fi
}

convert "$SRCROOT/Models/BallDiffuseMap.png" "$SRCROOT/Models/PVR/BallDiffuseMap.pvr"
convert "$SRCROOT/Models/Baselayer.png" "$SRCROOT/Models/PVR/Baselayer.pvr"
convert "$SRCROOT/Models/BlueGoalieDiffuseMap.png" "$SRCROOT/Models/PVR/BlueGoalieDiffuseMap.pvr"

# ... of course you got to modify this list to match your textures and folders ...
Stylish UITextField & UILabel with Gradients and Drop Shadows
As promised in another post, here are some recent findings on achieving stylish text rendering on iOS: If you’re anything like me, you’re doing design mockups in Adobe Photoshop first, put different elements into PNGs and then code the UI behavior and animations in XCode. This works great up to the point where you hit one of two things:
- You want to localize your app to various languages and have to render PNGs for each language
- You have dynamic textual content, e.g. player names, high scores, …
The problem is that in order to get high quality typography, one usually needs to add either a blurred drop shadow, a gradient or an outer glow. Since this is just a ticking of a checkbox in Photoshop’s layer style pallet, we all have become so accustomed to seeing this that plain solid color text just doesn’t do anymore.
While there are a number of tutorials and source code examples on the web for this, I’ve found that in my case, they lacked something in one area or the other. Hence this post.
While there are a number of tutorials and source code examples on the web for this, I’ve found that in my case, they lacked something in one area or the other. Hence this post.
Gradients
Let’s start with gradients: After some research, I stumbled upon Dimitris Doukas Blog http://dev.doukasd.com/2011/05/stylelabel-a-uilabel-with-style/ . He creates a gradient image and then set’s the UILabel’s textcolor property to a pattern brush using UIColor::colorWithPatternImage: . There were two problems that his code did not handle that were quite important for me:
- He does it for a UILabel but I needed it to work for a UITextField as well
- His code does not handle a UILabel that has multiple lines of text
- It did not work well for me when the frame is much larger than the text contained in it.
The second is quite easy to fix by analyzing how many lines the text will be split to and creating appropriate gradient image. The only tricky bit is to make sure the first line of pixels from a text line does not spill into the previous line. In my first approach, I had a blue to red gradient and the second text line sure enough started with a thin line of bright red. The frame issue can also be addressed by modifying his gradient creation routine a bit, no biggy.
Adapting his code for UITextField was rather straight forward except for – of course – the usual unexpected problems. Chief among which was that upon setting a pattern image color, the UITextField would not show any text while in editing mode. The only solution I found for this this far is to implement the UITextFieldDelegate::textFieldShouldBeginEditing: method and temporarily set the textColor back to a non-image-based color. I would love to have this handled inside my ExtendedUITextField class as well, but using key-value-observing did not seem to work.
One trivial optimization of Dimitris code was to create the gradient with a width of 1 pixel. Since the pattern color brush repeats the texture anyway, it should reduce the memory footprint and be faster to generate although I didn’t do any profiling on that. It just seemed to make sense.
Drop Shadows
Drop shadow’s were also an issue when going from UILabel to UITextField. There are two main approaches to doing drop shadows in iOS:
- CoreGraphics: Overwrite drawTextInRect and use the CGContextSetShadowWithColor.
- CoreAnimation: Use CALayer::shadowOpacity and the various other shadow properties on CALayer and have CoreAnimation render the shadow for you.
Again, it turns out that UITextField is a bit tricky. I wanted to use CoreGraphics as this gives you the best performance but on UITextField, the drop shadow ended up being cropped at the bottom all the time. So I currently use CoreAnimation for my ExtendedUITextField and CoreGraphics for my ExtendedUILabel. At first I – for the sake of consistency – tried to use CoreAnimation for both labels and text fields, but when animating the various elements in my UI, performance was just too bad.
On a side note, I found the shadow stuff to nice to use as an outer glow replacement when I don’t need a drop shadow. For example, the score board in Streetsoccer uses subtle gradients and outer glows which are hardly noticeable but if you see the before and after, it makes a huge difference.
Summary
I wish I had done this research sooner. Everything looks much more professional now. The only problem I have is that my labels currently use Photoshop’s Trajan Pro font and that one is a) not available on iOS and licensing fees for embedding fonts are in general quite outrageous and b) I need full unicode support for the text fields while Trajan Pro only has like the ASCII characters. I almost see myself buying a font creator tool and doing my own custom true type font…
– Alex
Source Code
For completeness sake, here is the code as I currently use it. It is far from perfect, so if you decide to use it, do so at your own risk. I posted it just for educational purposes.
ExtendedLabel.h
#import <UIKit/UIKit.h>

@interface ExtendedLabel : UILabel
{
    NSArray *gradientColors;
    UIColor *strokeColor;

    CGFloat shadowBlur;
    CGSize shadowOffset;
    UIColor * shadowColor;
    BOOL isGradientValid;
}

@property (retain) NSArray *gradientColors;
@property (retain) UIColor *strokeColor;

- (void)setShadowWithColor:(UIColor *)color Offset:(CGSize)offset Radius:(CGFloat)radius;

@end
ExtendedLabel.m
#import "ExtendedLabel.h"
#import <QuartzCore/QuartzCore.h>

@implementation ExtendedLabel
@synthesize gradientColors, strokeColor;

- (void)dealloc
{
    [gradientColors release];
    [strokeColor release];

    [super dealloc];
}

- (void)resetGradient
{
    if (CGRectEqualToRect(self.frame, CGRectZero))
    {
        return;
    }

    if ( [self.gradientColors count] == 0 )
    {
        self.textColor = [UIColor blackColor];
        return;
    }
    if ( [self.text length] == 0 )
    {
        return;
    }

    UIGraphicsBeginImageContext(CGSizeMake(1, self.frame.size.height));
    CGContextRef context = UIGraphicsGetCurrentContext();
    UIGraphicsPushContext(context);

    int const colorStops = [self.gradientColors count];
    CGSize lineSize = [self.text sizeWithFont:self.font];
    CGSize textSize = [self.text sizeWithFont:self.font constrainedToSize:self.bounds.size lineBreakMode:self.lineBreakMode];
    CGFloat topOffset = (self.bounds.size.height - textSize.height) / 2.0f;
    CGFloat lines =  textSize.height / lineSize.height;

    size_t num_locations = colorStops * lines + 2;
    CGFloat locations[num_locations];
    CGFloat components[num_locations * 4];
    locations[0] = 0.0f;
    [[gradientColors objectAtIndex:0] getRed:&(components[0]) green:&(components[1]) blue:&(components[2]) alpha:&(components[3])];
    locations[num_locations - 1] = 1.0f;
    [[gradientColors lastObject] getRed:&(components[(num_locations-1) * 4]) green:&(components[(num_locations-1) * 4 + 1]) blue:&(components[(num_locations-1) * 4 + 2]) alpha:&(components[(num_locations-1) * 4 + 3])];
    for ( int l = 0; l < lines; ++l )
    {
        for ( int i = 0; i < colorStops; ++i )
        {
            int index = 1 + l * colorStops + i;
            locations[index] = ( topOffset + l * lineSize.height + lineSize.height * (CGFloat)i / (CGFloat)(colorStops - 1) ) / self.frame.size.height;

            UIColor *color = [gradientColors objectAtIndex:i];
            [color getRed:&(components[4*index+0]) green:&(components[4*index+1]) blue:&(components[4*index+2]) alpha:&(components[4*index+3])];
        }

        // Add a little bit to the first stop so that it won't render into the last line of pixels at the previous line of text.
        locations[1 + l * colorStops] += 0.01f;
    }

    CGColorSpaceRef rgbColorspace = CGColorSpaceCreateDeviceRGB();
    CGGradientRef gradient = CGGradientCreateWithColorComponents(rgbColorspace, components, locations, num_locations);
    CGPoint topCenter = CGPointMake(0, 0);
    CGPoint bottomCenter = CGPointMake(0, self.frame.size.height);
    CGContextDrawLinearGradient(context, gradient, topCenter, bottomCenter, 0);

    CGGradientRelease(gradient);
    CGColorSpaceRelease(rgbColorspace);

    UIGraphicsPopContext();
    self.textColor = [UIColor colorWithPatternImage:UIGraphicsGetImageFromCurrentImageContext()];
    UIGraphicsEndImageContext();
}

- (void)setShadowWithColor:(UIColor *)color Offset:(CGSize)offset Radius:(CGFloat)radius
{
    shadowOffset = offset;
    shadowBlur = radius;
    [color retain];
    [shadowColor release];
    shadowColor = color;

    [self setNeedsDisplay];
}

- (void)setText:(NSString *)text
{
    [super setText:text];
    isGradientValid = NO;
}

- (void)setFont:(UIFont *)font
{
    [super setFont:font];
    isGradientValid = NO;
}

- (void)setFrame:(CGRect)aFrame
{
    [super setFrame:aFrame];

    isGradientValid = NO;
}

- (CGRect)textRectForBounds:(CGRect)rect
{
    return CGRectMake(rect.origin.x + MAX(0, shadowBlur - shadowOffset.width), rect.origin.y + MAX(0, shadowBlur - shadowOffset.height), rect.size.width - ABS(shadowOffset.width) - shadowBlur, rect.size.height - ABS(shadowOffset.height) - shadowBlur);
}

- (void)drawTextInRect:(CGRect)rect
{
    if ( isGradientValid == NO )
    {
        isGradientValid = YES;
        [self resetGradient];
    }

    CGContextRef context = UIGraphicsGetCurrentContext();

    //draw stroke
    if (self.strokeColor != nil)
    {
        CGContextSetStrokeColorWithColor(context, strokeColor.CGColor);
        CGContextSetTextDrawingMode(context, kCGTextFillStroke);
    }

    // Note: Setting shadow on the context is much faster than setting shadow on the CALayer.
    if ( shadowColor != nil )
    {
        // We take the radius times two to have the same result as settings the CALayers shadow radius.
        // CALayer seems to take a true radius where CGContext seems to take amount of pixels (so 2 would
        // be one pixel in each direction or something like that).
        CGContextSetShadowWithColor(context, shadowOffset, shadowBlur * 2.0f, [shadowColor CGColor]);
    }

    [super drawTextInRect:rect];
}

@end
ExtendedTextField.h
#import <UIKit/UIKit.h>


@interface ExtendedTextField : UITextField
{
    NSArray *gradientColors;
    UIColor * placeholderColor;
    UIColor *strokeColor;

    CGFloat shadowBlur;
    CGSize shadowOffset;
    BOOL isGradientValid;
}

@property (retain) NSArray *gradientColors;
@property (retain) UIColor *placeholderColor;
@property (retain) UIColor *strokeColor;

- (void)setShadowWithColor:(UIColor *)color Offset:(CGSize)offset Radius:(CGFloat)radius;

@end
ExtendedTextField.m
#import <QuartzCore/QuartzCore.h>
#import "ExtendedTextField.h"


@implementation ExtendedTextField
@synthesize gradientColors, placeholderColor, strokeColor;

- (void)dealloc
{
    [gradientColors release];
    [strokeColor release];
    [placeholderColor release];

    [super dealloc];
}

- (void)resetGradient
{
    if (CGRectEqualToRect(self.frame, CGRectZero))
    {
        return;
    }

    // create a new bitmap image context
    UIGraphicsBeginImageContext(self.frame.size);

    // get context
    CGContextRef context = UIGraphicsGetCurrentContext();

    // push context to make it current (need to do this manually because we are not drawing in a UIView)
    UIGraphicsPushContext(context);

    //draw gradient
    CGGradientRef gradient;
    CGColorSpaceRef rgbColorspace;

    CGSize textSize;
    if ( [self.text length] != 0 )
    {
        textSize = [self.text sizeWithFont:self.font];
    }
    else
    {
        textSize = [self.placeholder sizeWithFont:self.font];
    }
    if ( textSize.height == 0.0f )
    {
        return;
    }

    //set uniform distribution of color locations
    size_t num_locations = [gradientColors count];
    CGFloat locations[num_locations];
    for (int k=0; k<num_locations; k++) {
        locations[k] = textSize.height / self.frame.size.height * (CGFloat)k / (CGFloat)(num_locations - 1); //we need the locations to start at 0.0 and end at 1.0, equaly filling the domain
    }

    //create c array from color array
    CGFloat components[num_locations * 4];
    for (int i=0; i<num_locations; i++) {

        UIColor *color = [gradientColors objectAtIndex:i];
        [color getRed:&(components[4*i+0]) green:&(components[4*i+1]) blue:&(components[4*i+2]) alpha:&(components[4*i+3])];
    }

    rgbColorspace = CGColorSpaceCreateDeviceRGB();
    gradient = CGGradientCreateWithColorComponents(rgbColorspace, components, locations, num_locations);
    CGPoint topCenter = CGPointMake(0, 0);
    CGPoint bottomCenter = CGPointMake(0, self.frame.size.height);
    CGContextDrawLinearGradient(context, gradient, topCenter, bottomCenter, 0);

    CGGradientRelease(gradient);
    CGColorSpaceRelease(rgbColorspace);

    // pop context
    UIGraphicsPopContext();

    // get a UIImage from the image context
    UIImage *gradientImage = UIGraphicsGetImageFromCurrentImageContext();

    // clean up drawing environment
    UIGraphicsEndImageContext();

    self.textColor = [UIColor colorWithPatternImage:gradientImage];
}

- (void)setShadowWithColor:(UIColor *)color Offset:(CGSize)offset Radius:(CGFloat)radius
{
    shadowOffset = offset;

    self.layer.shadowOpacity = 1.0f;
    self.layer.shadowRadius = radius;
    self.layer.shadowColor = color.CGColor;
    self.layer.shadowOffset = offset;
    self.layer.shouldRasterize = YES;

    [self setNeedsDisplay];
}

- (void)setText:(NSString *)text
{
    [super setText:text];
    isGradientValid = NO;
}

- (void)setFont:(UIFont *)font
{
    [super setFont:font];
    isGradientValid = NO;
}

- (void)setFrame:(CGRect)aFrame
{
    [super setFrame:aFrame];

    isGradientValid = NO;
}

- (CGRect)textRectForBounds:(CGRect)rect
{
    return CGRectMake(rect.origin.x + MAX(0, shadowBlur - shadowOffset.width), rect.origin.y + MAX(0, shadowBlur - shadowOffset.height), rect.size.width - ABS(shadowOffset.width) - shadowBlur, rect.size.height - ABS(shadowOffset.height) - shadowBlur);
}

- (void)drawTextInRect:(CGRect)rect
{
    if ( isGradientValid == NO )
    {
        isGradientValid = YES;
        [self resetGradient];
    }

    CGContextRef context = UIGraphicsGetCurrentContext();

    //draw stroke
    if (self.strokeColor != nil)
    {
        CGContextSetStrokeColorWithColor(context, strokeColor.CGColor);
        CGContextSetTextDrawingMode(context, kCGTextFillStroke);
    }

    [super drawTextInRect:rect];
}

- (CGRect)placeholderRectForBounds:(CGRect)rect
{
    return CGRectMake(rect.origin.x + MAX(0, shadowBlur - shadowOffset.width), rect.origin.y + MAX(0, shadowBlur - shadowOffset.height), rect.size.width - ABS(shadowOffset.width) - shadowBlur, rect.size.height - ABS(shadowOffset.height) - shadowBlur);
}

- (void)drawPlaceholderInRect:(CGRect)rect
{
    if ( isGradientValid == NO )
    {
        isGradientValid = YES;
        [self resetGradient];
    }

    [super drawPlaceholderInRect:rect];
}

@endBlog moved to tumblr
Believe it or not, up to now I’ve been doing blog posts the hard way, i.e. hand crafted HTML. While this produced very clean HTML output, it just lacked a number of features I really wanted like tags, comments and so on. So when I found out about tumblr, it was rather a question of finding the time to move everything than do it or not do it…
Actually, the whole procedure was rather painless although it took a couple of hours to figure all the customization stuff out:
Getting tumblr to work as a subdomain of athenstean.com was quite easy: add a new configuration to my DNS account, add the address inside tumblr, done. Customizing the appearance was a bit more tricky. Basically one does write a HTML template and adds certain text fragments defined by tumblr which are then filled in to show the blog text, comments, images, … the only tricky part was that I like centered images/videos inside text and sometimes like to have text floating around images. The trick is to define a custom CSS inside the “customize appearance” tumblr dialog and then use CSS-classes not CSS-styles inside the blog posts. For some reason tumblr’s HTML editor removes all style attributes when saving changes. This is most likely to support a very cool feature that allowed me to copy&paste my old posts from the browser into the editor and automatically matched what was a heading, what was an image and what was normal text.
I’m now trying to figure out how to add the tags and comment part to my customized appearance…
– Alex
Streetsoccer Menus
As promised, here is a video of the new menus in action. Most of the work is done, but what is missing are the team profile, career mode and the AI character images. As some may notice, I just dumped in the ones from Monkey Dash for now.
On the coding side, a lot has been achieved: OpenAL sound and background music, fixed lots of bugs, reduced memory consumption, … all in all, it gets closer and closer to being a proper, stable app. I’m currently hoping for end of January as a possible release date but that will probably depend on how long it will take to do the in-game 3D assets properly.
– Alex