I’ve lately been working on creating 3D models for Streetsoccer that act as background props. One of the most interesting areas is low poly trees and if you look through the Internet, there is hardly any good information out there. Most low poly assets or tutorials one finds do not work well in real time engines due to two things that are always difficult in real time 3D: Transparency and self-shadowing. Since a lot of people I talked to didn’t have the experience of falling into all the pit falls related to that topics yet, I thought I just quickly write down some of them and what one can do about them.
A common technique to create low poly trees is to use a texture of a cluster of leaves, put it on a plane, sub-divided it and bend it a little. Use 5-10 of those intersecting each other and it looks quite alright. The problem is that in reality the upper parts of a tree are casting shadows to the lower parts. So if you use just one texture of leaves, you either end up with a tree that has the same brightness everywhere. If you want to do it right, you end up using multiple textures depending on which part of the cluster has shadow on it and which doesn’t. If you go to stock asset suites, those trees usually look great because they have been raytraced and have some form of ambient occlusion on them.
The other area is transparency. As you may or may not know, real time 3D rendering is rather stupid: Take a triangle, run it through some matrices, calculate some simplified form of lighting equation and draw the pixels on the screen. Take next triangle, run the math again, put pixels on the screen, and so on. So things order of occlusion is in general dependent on the order of triangles in a mesh and the order of meshes in a scene. To fix this, someone invented the Z-Buffer or Depth Buffer which for each pixel stores the depth of the pixel that has been drawn to the screen. Before drawing a pixel, we check whether the pixel the new triangle wants to draw is before or behind the depth value stored in the depth buffer for the last stuff we put at that pixel. If the triangle is behind it, we don’t draw the pixel. This saves us the trouble of sorting all triangles by depth from the viewer position before drawing. By the way, all of this is explanation is rather over-simplified and boiled down to what you need to know for the purposes of this discussion.
Considering that real time 3D graphics work on a per-triangle basis, transparency obviously becomes difficult. Following the description above, there is no real “in front or behind” but rather “what’s on the screen already and what’s getting drawn over it”. So what real time APIs like OpenGL or DirectX do is use Blending. When a non-100% opaque pixel is drawn, it is blended with what is already on the screen proportionally with the transparency of the new triangle. That solves the color (sort of) but what about depth? Do we update the value in the depth buffer to the depth of the transparent sheet of glass or keep it at its old value? What happens if the next triangle is also transparent but lies in between the previous? The general rule is that one has to sort all transparent objects by depth from the viewer and after rendering all opaque objects, render the transparent one in correct order.
If you’ve read a bit about 3D graphics, that should all sound familiar to you. So here comes the interesting parts: The things you don’t expect until you run into them!
Filtering and Pre-Multiplied Alpha Textures
Whenever a texture is applied and the size of the texture does not match the size of the pixels it is drawn to, filtering occurs. The easiest form of filtering is called nearest neighbor where the graphics card just picks the single pixel that is closest to whatever U/V-value has been computed for a pixel on the triangle. Since that produces very ugly results, the standard is to use linear filtering, which takes the neighboring pixels into account and rather returns a weighted average. You probably have noticed this as the somewhat blurry appearance of textures in 3D games.
For reasons of both performance and quality, a technique called Mipmaps is often used which just means lower resolution versions of the original texture are pre-computed by the graphics card. If an object is far away, the lower resolution version is used which better matches the amount of pixels that object is drawn on and thus improves quality.
What few people have actually dealt with is that filtering and transparency do not work well together in real time 3D graphics. When using a PNG texture on iOS, XCode optimizes the PNG before bundling it into your app. Basically it changes the texture so that the hardware can work more efficiently. As one of the things, XCode pre-multiplies the alpha component on to the RGB components. What this means is that instead of storing r, g, b, alpha for each pixel, one stores r times alpha, g times alpha, b times alpha and alpha. The reasoning is that if an image has an alpha channel, the image usually has to be blended when it is rendered anyway and instead of multiplying alpha and RGB every time a pixel in an image is used, it is done once when the image is created. This usually works great and saves three multiplications.
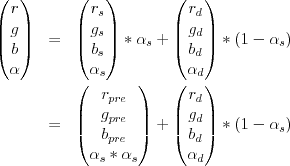
The trouble starts when filtering comes in. Imagine a red pixel that has an alpha value of zero. Multiply the two and you get a black pixel with zero alpha. Why should that be a problem, it’s fully transparent anyway, right? As stated above, filtering takes neighboring pixels into account and interpolates between them. What happens can be seen in Photoshop when creating gradients.
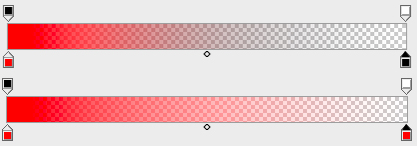
The closer the U/V-values are to the border of the opaque region of the texture and the larger the region of texture that is filtered to a single pixel, the more grayish the result becomes. I’ve first learned this the hard way when it came to the goal nets in Streetsoccer. As probably everyone would, I had just created one PNG with alpha in Photoshop and this is what it looked like:
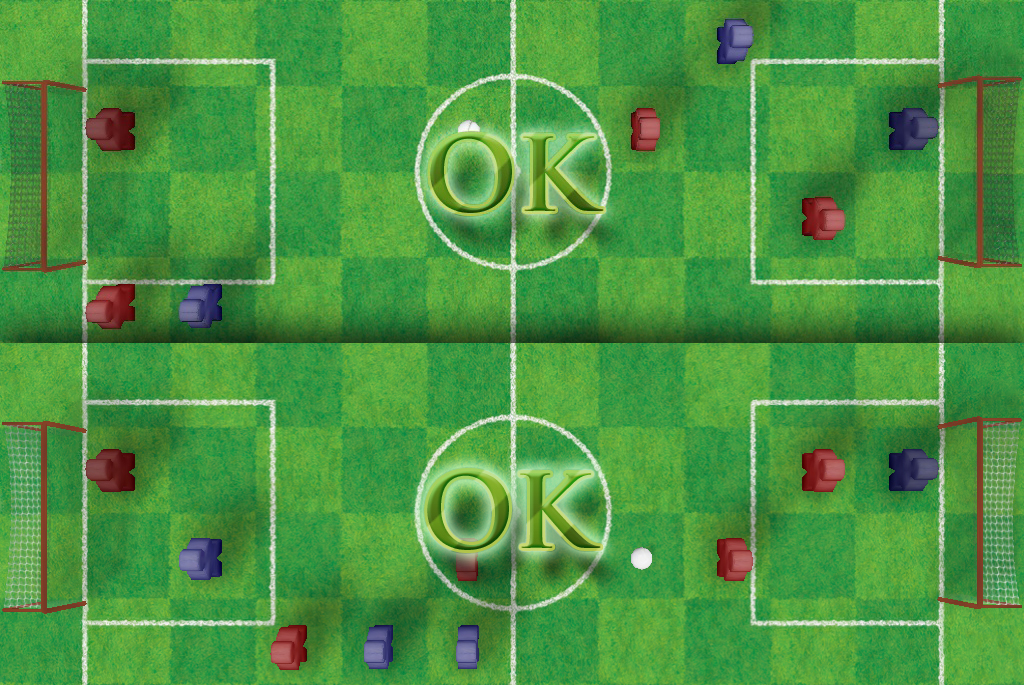
Although the texture is pretty much pure white, the premultiplied alpha at that distance makes the goal net look dark gray. So how do you get to the version below? Avoid premultiplied alpha!
What I’ve done in the shot below is use a separate alpha texture that is black and white in addition to the diffuse texture. During render time, the RGB values are used from the diffuse map and the alpha value is interpolated from the alpha map. I filled the previously transparent parts of the diffuse map with pixels that matched the opaque parts and the result speaks for itself.
Since the Streetsoccer code uses OpenGLES 1.1 right now, I couldn’t simply use a pixel shader but had to use register combiner. Since that’s kind of legacy code and information is hard to find, here is the code:
// Switch to second texture unit
glActiveTexture( GL_TEXTURE1 );
glEnable( GL_TEXTURE_2D );

// Active texture combiners and set to replace/previous for RGB. This
// just takes the RGB from the previous texture unit (our diffuse texture). glTexEnvf(GL_TEXTURE_ENV, GL_TEXTURE_ENV_MODE, GL_COMBINE);
glTexEnvf(GL_TEXTURE_ENV, GL_COMBINE_RGB, GL_REPLACE);
glTexEnvf(GL_TEXTURE_ENV, GL_SRC0_RGB, GL_PREVIOUS); // diffuse map
glTexEnvf(GL_TEXTURE_ENV, GL_OPERAND0_RGB, GL_SRC_COLOR);

// For alpha, replace/texture so we take the alpha from our alpha texture. glTexEnvf(GL_TEXTURE_ENV, GL_COMBINE_ALPHA, GL_REPLACE);
glTexEnvf(GL_TEXTURE_ENV, GL_SRC0_ALPHA, GL_TEXTURE); // alpha map
glTexEnvi(GL_TEXTURE_ENV, GL_OPERAND0_ALPHA, GL_SRC_ALPHA);

[self bindTexture:mesh.material.alphaTexture];

glActiveTexture( GL_TEXTURE0 );

[self bindTexture:mesh.material.diffusTexture];
One important thing though is that the alpha map has to be uploaded as an GL_ALPHA texture instead of the usual GL_RGB or GL_RGBA, otherwise this won’t work. Speaking of which, I might probably just have combined the two UIImages during upload and uploaded them as one GL_RGBA texture… got to check that one out… : )
Intra-object Occlusion
A lot of people are aware of the object-2-object occlusion problem when using transparency and that one has to use depth-order-sorting to solve it. However, what I noticed just lately is that – of course – the same problem can also arise within a single object.
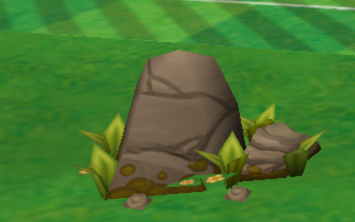
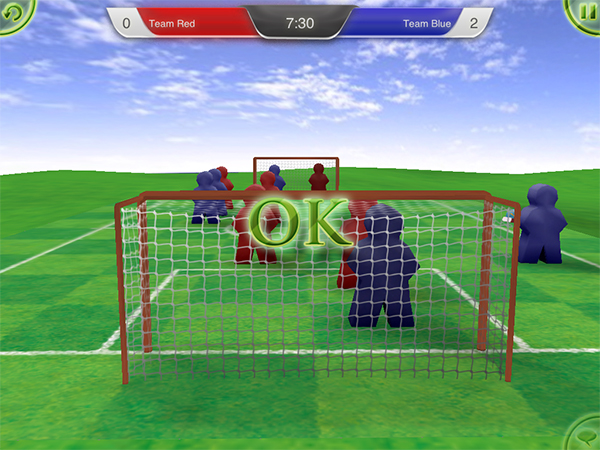
The screenshot above was generated during early testing of the alpha map code. I used an asset from the excellent Eat Sheep game which they kindly provide on their website. Again, it is quite obvious, but again, I was surprised when I save this. What happens here is that the triangles with the flowers are rendered before the stone but all are within the same mesh. Doing depth sorting for each triangle is a bit overkill and sorting per-object clearly does not work here. In the original game, this is not a problem because the asset is usually seen from above.
Not sure what to do about this one just yet. One could edit the mesh to have the flower triangles behind the others inside the mesh’s triangle list but that would be have to re-done every time the mesh is modified. The other idea is to split it into two objects, which of course produces an overhead of a couple of context switches for OpenGL. But for trees with a large viewing angle, that will exploded the number of meshes…
Update Dec 17, 2012
Well, I did a bit more of digging yesterday and the situation gets even weirder. According to some sources on the net:
- Photoshop produces PNGs with pre-multiplied alpha
- The PVR compression tool shipped with iOS does straight alpha (but the PVR compression tool from the PowerVR website can also do pre-multiplied)
- XCode always does pre-multiplied for PNGS as part of its optimizations
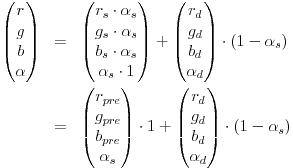
And to make things even more interesting, pre-multiple alpha seems not only to be the source of my original problem but also the answer. The most cited article on this topic seems to be TomF’s Tech Blog. Turns out, if your mipmap texture is in pre-multiplied alpha, filtering does not cause any fringes, halos or whatever, one just has to switch to a different blending function (that is ONE and ONE_MINUS_SRC_ALPHA … which matches my equation from above)…. well, in fact it doesn’t. For as long as I’ve been doing OpenGL, I’ve always read “use alpha and 1-alpha” but that’s wrong! If you check the equation above and assume you are blending a half-transparent pixel on to an opaque pixel, you get 0.5×0.5+1.0×0.5=0.75. That’s clearly not what we want. I’m seriously wondering why this hasn’t caused more problems for me!
The right way to do it is use glBlendFuncSeparate to have a different weighting for the alpha channel, which gives us a new equation and finally one that matches what pre-multiplied alpha does (note that most sources use ONE and not ONE_MINUS_SRC_ALPHA as destination alpha weight in the non-pre-multiplied alpha case which doesn’t seem right if you ask me):
There seems to be concerns on whether or not premultipled alpha causes problems when using texture compression. However, fact is that using a separate texture map adds a number of OpenGL calls for the texture combiners (less important of an argument for OpenGLES 2.0 shaders) and another texture bind. So I guess I’ll try to change my content pipeline to use all pre-multiplied alpha textures!
– Alex


Leave a Reply